
An Introduction to Camunda's Inbound Webhook Connector
Small Tool, BIG Impact


When people talk about Camunda connectors, they usually think about the big ones. HTTP. REST. Kafka. All the things with long config panels. But the tiny webhook connector often gets ignored. And that is a shame. It is one of the most useful pieces in the toolbox because it solves a very real problem. How do you let the outside world safely poke your process without exposing a full API or writing boilerplate?
The webhook connector gives you a simple endpoint you can call from anywhere. There is no controller class, no extra service. Just configure it in your model and you are done. And even if it looks simple, it has a lot of power hidden in a few fields.
What the Webhook Connector Can Do
Using a webhook to start a process is often easier than using a regular start event because almost every system can send a plain HTTP request. The caller does not need a Zeebe client or any workflow knowledge. You give them a URL and they can trigger your process right away.

A webhook also lets you send a clear response back. You can return a simple confirmation, an instance id or an error message. This keeps the integration easy to understand and avoids guesswork on the caller side.
Endpoint Configuration
Every webhook needs an address, and the connector gives you full control over how that address looks and how it behaves. The endpoint configuration defines two things. The HTTP method the webhook will accept and the id that becomes part of the final URL.
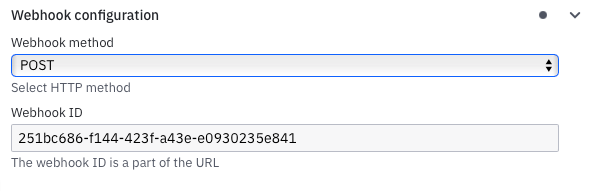
Once the method and id are set, the connector exposes the webhook at a fixed URL after deployment:
https://<region>.connectors.camunda.io/<cluster_id>/inbound/<webhook_id>The region and cluster id come from your Camunda setup. This makes the URL predictable and easy to integrate. You can hand it over to any external system, and they can start sending requests without any additional routing or infrastructure.
HMAC Authentication
The webhook connector supports HMAC (hash-based message authentication code) authentication. This is useful when you need a simple but secure way to verify that the request really comes from the expected sender. Many platforms use HMAC for webhook signing because it does not rely on passwords or tokens that can be reused.
To achieve this, the sender takes the payload, combines it with a shared secret and runs it through a hashing algorithm. The result is a signature. The receiver does the same calculation. If both signatures match, the message is trusted. If not, the request is rejected.
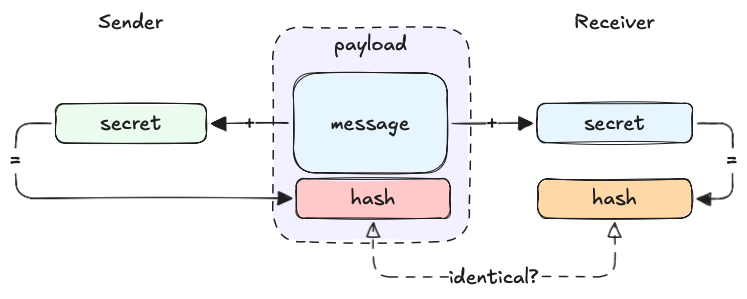
The important part is that the shared secret never travels over the network. Only the signature does.
Authorization Options
Webhooks are public entry points, so you usually need some protection. The connector supports three common patterns that work with most systems.
Basic Authorization
Basic auth is simple and widely supported. The caller sends a username and password in the Authorization header. The webhook connector checks the values and only accepts the request if they match. The password comes from the connector runtime’s secret store, not from your BPMN model.

This is a good fit when you control both sides or when the calling system only supports basic auth.
API Key Authorization
Many webhook providers still use API keys. The connector supports keys in headers or in the request body. You define an expression that selects where the key comes from. The connector reads it and checks it against the stored secret.
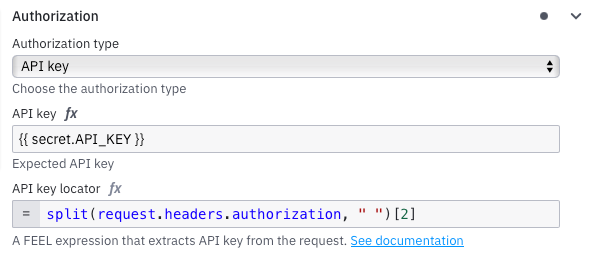
This works well for simple shared-key setups or when you need a lightweight alternative to JWT.
JWT Authorization
If the caller sends JWTs, the connector can validate them before the workflow starts. You provide an expression to extract the token and the rules for checking it. The connector verifies the signature and claims. This is useful when the caller uses an identity provider and you want to avoid static credentials.
Special Webhook Features
Verification Expression
The one time verification is evaluated first when a message arrives. It solves a very common problem. Many platforms do not trust a webhook until they have checked that it actually exists. They send a special request before sending any real events. This request usually includes a challenge field or a flag that marks it as a verification attempt.
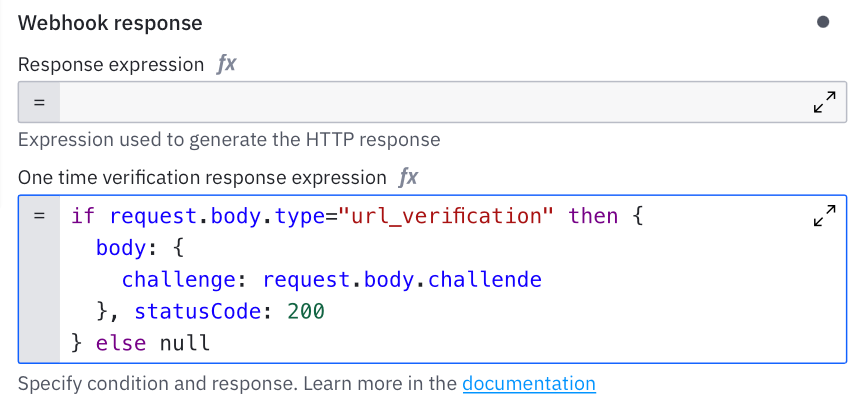
Without this feature you would have to create your own API layer, detect the verification request yourself and make sure you do not accidentally start a workflow. The webhook connector handles all of this for you. You write a small expression that detects the handshake request. When it matches, the connector returns a custom payload and stops. No process instance is created, no variables are set and no business logic is triggered.
Activation Condition
The activation condition solves a different problem. Sometimes a request is valid at the HTTP level but does not contain the data you need to start a process. Without this feature you would either create a broken process instance or you would have to wrap the webhook behind a custom API.
The activation condition lets you block bad or incomplete requests before they turn into running processes. You write a FEEL expression that returns true or false. If the condition returns false, the connector responds with a 422 and stops.
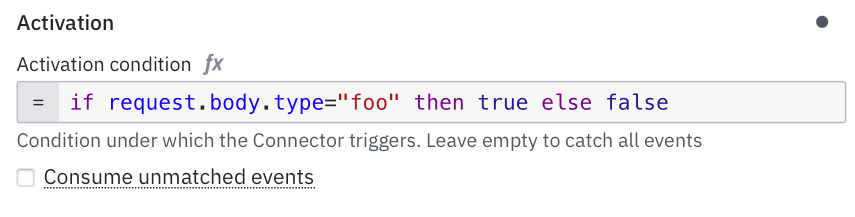
You can also turn off “Consume unmatched events” to prevent anything from slipping through.
Response Expression
When you start a process from a webhook, the caller usually wants to know what happened. Did the process start and what is its key? In many systems you would need to create a controller, map the result and build a custom JSON response.
Here you just define the response in the model. After the process instance is created the response expression is evaluated. You can return any data you want, e.g. the instance key. You can also map values from the original payload or from variables set by the connector.
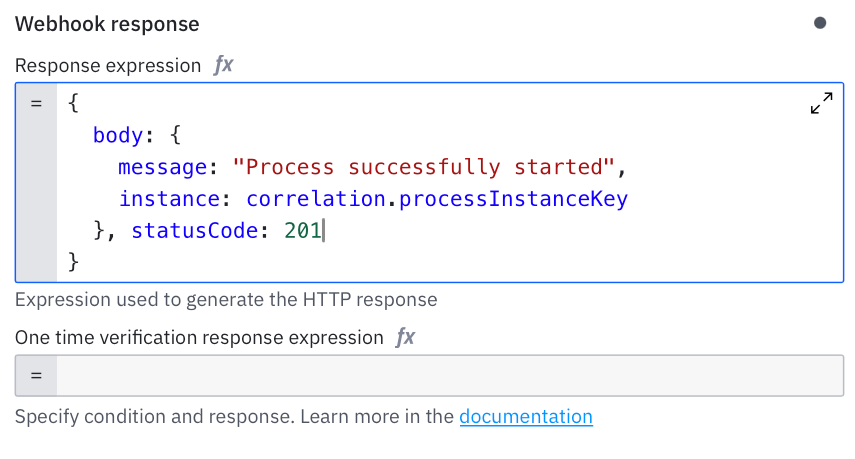
This makes the webhook feel like a small but well behaved API endpoint. The caller gets a meaningful response and your integration becomes easier to work with.
Instance Correlation
When you use the webhook connector as an intermediate event, the behavior is different from a start event. Instead of creating a new process instance, the webhook should continue an existing one. This creates a new challenge. You might have several running instances waiting at the same webhook. The connector must know which one should continue.
Correlation solves this by matching incoming data with a value inside a specific process instance. When the values match, the message goes to the right instance and the workflow continues.
How Correlation Works
You configure two things.
A correlation key inside your process. This is usually a variable like an orderId or any other unique identifier.
An expression that extracts the same value from the incoming webhook payload.
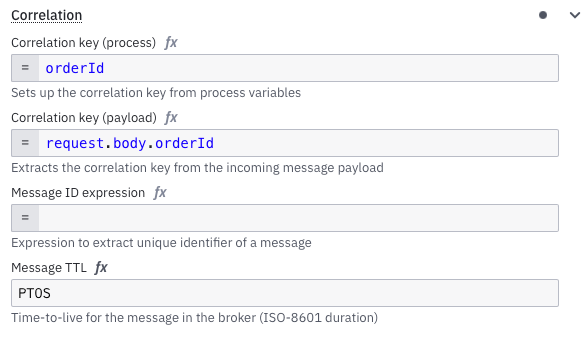
When a request arrives, the connector runtime evaluates the expression. It compares the extracted value with the correlation key of all waiting instances. If it finds a match, that instance continues. If not, nothing happens.
This makes the system safe even when many instances are waiting at the same intermediate event.
Handling Late Messages
There are cases where the callback arrives before the process reaches the waiting state. The connector can handle that too. You can enable message queuing for a certain time window. The webhook call is temporarily stored. When the process instance arrives at the intermediate webhook, the queued message is delivered immediately and the workflow continues.
This makes your integrations more robust. Slow workflow. Fast callback. Out of order delivery. It does not matter. Correlation and queuing make sure everything lines up correctly.
Conclusion
The webhook connector solves real problems. It gives you a safe entry point into your model, lets you validate requests, handle callbacks and control when a process should start. And you get all of this without writing extra controllers or custom code.
If you only ever used it to start a process, you have more to explore. It is a flexible way to let external systems talk to your workflows while you stay in control.
On my next post I will show a real life example on how you can validate your request payload with the mechanisms above. Stay tuned!
Great and clear explanation!!